
How to Extract All Video or Audio Files from a PowerPoint Deck

Try This Great Trick to Easily Extract All Embedded Video or Audio from a PowerPoint Presentation
Avantix Learning Team | Updated August 11, 2021
Applies to: Microsoft ® PowerPoint ® 2013, 2016, 2019 and 365 (Windows)
If you want to extract embedded video or audio files from a Microsoft PowerPoint deck to use in another presentation, you can copy and paste them between presentations or you can extract them by converting the presentation to a zip file type. Starting in PowerPoint 2010, video and sound files are embedded (copied into the presentation) by default.
In newer versions of PowerPoint, you can right-click a video or audio file (typically in Normal View), select Save Media As from the drop-down menu and save the file with a new name on your PC or a shared drive.
The following trick to extract all media works with any Microsoft PowerPoint file using XML (Extensible Markup Language) format. XML files are stored as a package and can therefore be unzipped. They also end with an "x" such as .pptx (2007 and later versions).
Note: You can't extract YouTube videos that are embedded in a presentation using this method.
Recommended article : How to Insert or Embed a Video from a File in PowerPoint (and Control Playback)
Do you want to learn more about PowerPoint? Check out our virtual classroom or live classroom PowerPoint courses >
Extract video and audio files by changing the file extension
In order to use the following procedure, Windows Explorer must be set so that it shows file names with extensions.
To extract embedded video and audio files from a PowerPoint deck:
- In Windows Explorer, select the presentation (it should have a .pptx extension) with the embedded video and audio you wish to extract.
- Right-click and choose Copy or press Ctrl + C.
- Right-click and choose Paste or press Ctrl + V.
- Right-click the copy of the presentation and choose Rename in the drop-down menu.
- Change the file extension .pptx to .zip (Windows must be set to display file extensions).
- Press Enter. A dialog box appears warning you that the file may become unusable if you change the extension.
- Click Yes to continue. The file icon changes to a folder icon.
- Double-click the zipped folder. The zipped folder contains multiple folders (some contain information such as XML code or properties).
- Double-click the ppt folder.
- Double-click the media folder to view image, video and audio files. Each file is given a generic name.
- Copy these files (or the entire folder) to another location for use in other presentations and to rename the files. Copying to another location will unzip the files. You can also click the Extract button in Windows Explorer to extract the files to another location.
Linked audio and video files will not be extracted.
This article was first published on July 15, 2017 and has been updated for clarity and content.
Subscribe to get more articles like this one
Did you find this article helpful? If you would like to receive new articles, join our email list
More resources
How to Insert a Video in PowerPoint (from a File on Your PC or Shared Drive)
How to Embed a YouTube Video in PowerPoint
PowerPoint Keyboard Shortcuts to Play and Control Video During a Slide Show
A Beginner's Guide to Video Formats in PowerPoint
Related courses
Microsoft PowerPoint: Intermediate / Advanced
Microsoft PowerPoint: Design for Non-Designers
Microsoft PowerPoint: Animations Bootcamp
Microsoft Word: Intermediate / Advanced
Microsoft Word: Power User
VIEW MORE COURSES >
Our instructor-led courses are delivered in virtual classroom format or at our downtown Toronto location at 18 King Street East, Suite 1400, Toronto, Ontario, Canada (some in-person classroom courses may also be delivered at an alternate downtown Toronto location). Contact us at [email protected] if you'd like to arrange custom instructor-led virtual classroom or onsite training on a date that's convenient for you.
Copyright 2024 Avantix ® Learning
You may also like

How to Insert or Type the Copyright Symbol in PowerPoint (4 Ways with Shortcuts)
You can insert or type the copyright symbol (©) in PowerPoint using the Insert Symbol command or by using keyboard shortcuts. In this article, we'll review 4 ways to insert the copyright symbol in PowerPoint. You can insert the copyright symbol in Normal View or Slide Master View.

How to Insert or Type U with an Accent Mark in PowerPoint (Ù, Ú, Û, Ü, ù, ú, û, or ü)
You can insert or type u with an accent mark in PowerPoint using built-in tools or keyboard shortcuts (including Alt code shortcuts). The letter u can be inserted with an accent in both upper or lower case. The following are common accented characters that you can insert or type in PowerPoint in upper or lower case: grave (Ù or ù), acute (Ú or ú), circumflex (Û or û) and umlaut (Ü or ü).

How to Insert or Type O with an Accent Mark in PowerPoint (Ò, Ó, Ô, Õ, Ö, ò, ó, ô, õ or ö)
You can insert or type o with an accent mark in PowerPoint using built-in tools or keyboard shortcuts (including Alt code shortcuts). The letter o can be inserted with an accent in both upper or lower case. The following are common accented characters that you can insert or type in PowerPoint in upper or lower case: grave (Ò or ò), acute (Ó or ó), circumflex (Ô or ô), tilde (Õ or õ) and umlaut (Ö or ö).
MORE POWERPOINT ARTICLES >
Microsoft, the Microsoft logo, Microsoft Office and related Microsoft applications and logos are registered trademarks of Microsoft Corporation in Canada, US and other countries. All other trademarks are the property of the registered owners.
Avantix Learning |18 King Street East, Suite 1400, Toronto, Ontario, Canada M5C 1C4 | Contact us at [email protected]


Our Courses
Avantix Learning courses are offered online in virtual classroom format or as in-person classroom training. Our hands-on, instructor-led courses are available both as public scheduled courses or on demand as a custom training solution.
All Avantix Learning courses include a comprehensive course manual including tips, tricks and shortcuts as well as sample and exercise files.
VIEW COURSES >
Contact us at [email protected] for more information about any of our courses or to arrange custom training.
Privacy Overview
Pin it on pinterest.
- Print Friendly
How to extract videos and other media elements from PowerPoint presentations
There was a time when adding graphics elements in presentations used to make them look out of the world. But today, with improvement in technology, and to provide better infographics, videos are widely used in presentations to give them a unique look. Adding videos in presentations is nothing new, and such a thing is also supported by older versions of Microsoft Office, justifying it. But the way videos are added to the new versions of Microsoft PowerPoint has changed a lot for something better. It is no longer a problem to add videos in presentations and regret adding it, later on.
In the older versions of Microsoft PowerPoint, you could neither delete the source video nor move it to a different location on your storage device. Doing that will screw your presentation up, and you will no longer be able to display the video, though photos and images will remain unharmed. It means it used to be big trouble to carry presentations from your home to office or show the presentation on a separate system. What actually used to happen is that the presentation used to contain a link to the video, which was played while clicked on, or automatically.
But with the later version of Microsoft PowerPoint, the videos get embedded in the presentation itself, and you can do anything with the source without harming the presentation in any way.
But in some cases, you might need to extract those videos or other multimedia elements from the presentation if the source files are no longer available to you, or for similar other reasons. That is easily possible, and I will share the trick here.
So let’s get started with how you can extract videos and other multimedia elements from a presentation.
The steps to follow
Step 1: For safety, I would recommend you to create a copy of the presentation and then proceed with this trick to prevent harming the presentation in any way. But if you are a techie and know what you are doing, you can skip this step.
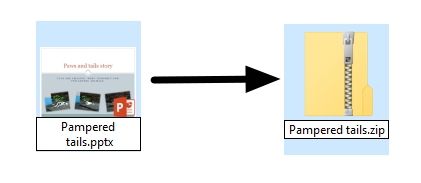
Step 2 : Now rename the PowerPoint presentation to change the extension from ‘pptx’ to ‘zip’ .
For example, if you are having a presentation with the name ‘ Pampered tails.pptx ’, rename it to ‘ Pampered tails.zip ’

Step 4: Open the folder that comes with the name ‘ppt’ .

Step 5: Now open the folder that has the name ‘media’ .

Step 7: Just extract all of them or extract the selected ones out of them for further activities. The media files here will come with the names ‘media1’ , ‘media2’ , for video files, ‘ image1 ’, ‘ image2 ’ for audio files and so on. As the default file names are not retained after getting added to the presentations, you will have to check all of them to find the one that you actually need.
You are always free to change the name of the files once you find the one that you need.
This tutorial is surely going to be very handy for you if you work a lot with PowerPoint presentations.
This trick works only for PowerPoint presentations with the new or pptx extension as pptx is actually a compressed file that contains all the elements separately for more flexibility. All the new Microsoft office extensions like xlsx, docx come with this provision, though you might not need the same feature for those extensions, as well.
Hope the small information was helpful for you. Are you still facing troubles? Feel free to comment it down below.
14 IoT business statistics so far to define the future of the Internet of Things
Tenda Showcased Networking Solutions at The Cable TV Show 2019
Related Posts

How to Electronically sign documents for free using Adobe Reader for PC and mobile

How to do hanging indents on Google Slides presentation on the web

How to embed a YouTube video in a Google Slides presentation

How to create a link for any document to share it?

6 Ways to get likable Netflix Show recommendations you would love to watch

How to Download and save Picutres of a Google Docs document
Leave a comment cancel reply.
This site uses Akismet to reduce spam. Learn how your comment data is processed .
Reach out to us for sponsorship opportunities or suggestions
Problems are meant to be solved.
© 2024 H2S Media

IMAGES
VIDEO
COMMENTS
If you want to separately use files or objects from a PowerPoint presentation, such as videos, photos, or sounds, you can extract them by converting the presentation to a "zipped" file folder. Note, however, that you can't extract PDFs or .dotx files. The following procedure works on Windows, but not on macOS.
Save embedded media from a presentation (audio or video) ... If there's an audio or video clip in a PowerPoint file that you want to reuse elsewhere, you can do so by saving the clip as a separate media file (.mp4 or .m4a). ... In earlier of versions of PowerPoint for macOS, the ability to extract media files isn't available. Right-click (or ...
Learn how to extract an embedded video from a PowerPoint presentation. ... an embedded video from a PowerPoint presentation. You may want to do this if you have lost the original copy of the video ...
Learn how to Extract Embedded Video in PowerPoint. This video is a response to a question raised in our comments section.Contents of this video:=====...
Starting in PowerPoint 2010, video and sound files are embedded (copied into the presentation) by default. In newer versions of PowerPoint, you can right-click a video or audio file (typically in Normal View), select Save Media As from the drop-down menu and save the file with a new name on your PC or a shared drive.
Troubled with playing PowerPoint videos?Do you want to separate your embedded videos?Yes! then you are in the right place.Here is a quick tip for your proble...
When you need the embedded video for advertisement or publicity and you don't have the access to the original file, you could extract video from PowerPoint presentation as well. Fortunately, there are a variety of useful solutions on how to extract video from PowerPoint after you make a PowerPoint presentation.
Step 6: You can find all the media files available within the presentation, in this folder. Step 7: Just extract all of them or extract the selected ones out of them for further activities.The media files here will come with the names 'media1', 'media2', for video files, ' image1 ', ' image2 ' for audio files and so on. As the default file names are not retained after getting ...
Extract Image, Video and Audio files from PowerPoint You can follow these simple steps to extract objects including media files from a PowerPoint presentation: Make a copy of your PowerPoint ...
If you've ever needed to extract a video that's been embedded inside a PowerPoint you may have found that it's not at all as straightforward as you'd hoped. ...